Saturday, January 30, 2010

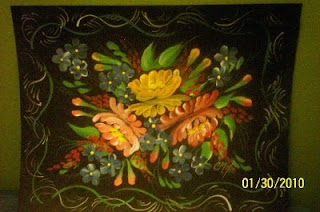
Tole painting...

I took a class a long time ago on tole painting
 and every now and then I pull out all my stuff and play.

Looks like my supplies have been used quite a lot...


 I was inspired by one of my tole trays that I collect.


I made some small flowers that I'll make into cards or tags...


and a large print that I'll have to frame....


It was a nice way to spend a cold Saturday afternoon.

Friday, January 29, 2010

Pressed flowers...

Did you ever press your own flowers?
I tend to pick some every year and stick them in a book,
but I never get around to using them.
So, using up some more of my stuff, I painted an old wood frame.

First a coat of white, sand some off, then add some stain...

Love the shabby look...


while that was drying, I was busy glueing pressed flowers onto some green cardstock...


add a chocolate brown matt and put the two together.....


I love the way it turned out!

I really can keep busy using all the supplies I already have.

It's for sale on my etsy shop, if interested....

http://www.etsy.com/shop/cottagegardenhome


Thursday, January 28, 2010

On line sales - etsy

Just started my own on-line site at etsy. Starting small. Here are a few items up for sale...

I have 3  different designs of these hand-cast paper heart decorations...


and 4 set of 5 floral notecards...


I plan on getting a lot more things out, but it's a start for now.
Wish me Luck!

You can see my shop at....

http://www.etsy.com/shop/cottagegardenhome

Wednesday, January 27, 2010

Floral cards.....

Keeping up with my New Years' resolution to start using up some of the craft supplies I already have on hand, I decided to sit down and make a few cards. I have sooooo much paper I really need to start using it up. So since I'm looking forward to Spring I thought I would hand paint a few floral cards...

Some daisies...

Some Iris....


Some roses...


Some impatiens...


Oh how flowers just put a smile on my face!


I made a set of 5 of each with coordinating envelopes. I hope to start selling some of my wares. I think I might try out etsy. Not sure how it works but I think I could figure it out. If you have any tips for selling, please share them!

Sunday, January 24, 2010

dessert stand / cheese dome...

I hope everyone is having a good weekend.
 I saw this project on a couple other blogs and fell in love.
 I'd like to share my version with you.

You start with a cheese stand with a glass dome, and a candle stick holder.
I also used an extra circle of wood.


Glue the pieces together...


Sand and paint...


I cut a piece of paper to fit inside. I also cut a piece of plastic mylar to go on top of the paper. You could probably decoupage it on but I wanted to be able to change it....


I had this adorable white pom-pom trim...


I hot glued this all around the edges...

I love the way it turned out!


Imagine all the different colors and seasons you can decorate this for!
You can also use the stand without the cover for many things like: plants, pictures, candles,etc.

I'm going to start selling these; have to keep my eyes open for old cheese domes!

Saturday, January 23, 2010

Final pics of entry....

Well, I think I'm done in my entry, except for painting, which will have to wait until spring.
I put up my rose pictures...
and these darling plate holders that I've had forever...

I found some cute bird plaques,
I just added some black so they would look better..
and of course the top shelf which I love...
Note to self.... make sure to take before pictures!
Have a great weekend everyone!

Thursday, January 21, 2010

Hallway - over the door swag...

Well I'm almost done in the hall entrance. Just a few more things to update. On the back of my door I have a lace panel, ( it's supposed to look like a window, I used to have a mirror behind it until my hubby wanted to install a peep hole) with a swag above it. Not too bad looking but I think it's outdated and definitely dusty...
Before...


I used some of those new (old) flowers and
some ivy and created a more romantic feel...

After...


I really like the way it turned out, what do you think?
Do you see the bells? I always have bells on my door so I can hear when someone comes in.
I'm also thinking of changing the color of my door? But what color? If I change the door I also have to change the trim. I was thinking maybe black, but that might be too dark. Any suggestions?

I also wanted to share a couple new things I added to my hutch and shelf. I know I said I wasn't going to buy more things at good will, but I couldn't resist this blue and white dish...

It looks great and repeats the blue and white color from the dishes on the hutch. And I found this little bird at Joann Fabrics for$1.50..


How sweet!

Monday, January 18, 2010

Entry - wall shelf....

Another area in my entry that I'm re-doing is the wall shelf.
 It's been this way such a long time - a bit out dated...


I love the way it turned out.

More cottage charm...


Everything I put up I already had or got from the thrift store...


A simple tin with just the right colors, a rusty star,
 a red vase and some greens from that old swag...


An adorable bird in cage, tray turned on its' side (in back),
and some more of those old flowers in a rooster pot...

I also made a wreath out of those old flowers and hung it below.


Before...             and                 After...


I could kick myself though - I got so caught up in putting things out
 that I forgot to take before pictures before I took everything down! Duh!

Sunday, January 17, 2010

Redecorated hutch....

Okay, I started changing things in my entry but I have to say the pictures I took look like crap. There isn't much natural  light and when I used the flash the colors don't look right - so use your imagination.

Here's my hutch before ...
( Oh, by the way, I'm thinking of painting it black in the spring, I think that would look much better).

Again, I apologize for the lighting.
Here's the after...

It looks so much better in person.
I love these blue and white plates I found at goodwill


Friday, January 15, 2010

Floral swag - Project #2....

In my entry I have a couple of  artificial flower arrangements that I need to redo to go with my cottage /garden feel. I know some don't like fake flowers at all, but I think they are fine. I found this large arrangement at the thrift store a while back that has the perfect color flowers. I should have taken a picture of it before I started tearing it apart, oh well.
Since it was so big, I should be able to get a few smaller arrangements out of it.

Project #2....

This is the way the swag looked before...... a bit out of date and dusty!

All I did was tear off the bow and the dried flowers,
I left the green leaves - they just needed a little dusting.
Hot glue guns are soooo handy, all I had to do was glue the new(old) flowers on.
And this is how it looks after...

So much better, don't you think?
I made sure I added some blue so it will still go with my walls.


I'm still not putting it up until I get everything ready.

Until next time....

Thursday, January 14, 2010

Project #1 - Rose pictures....

Well, I have a room in my house that I've been meaning to update. It's okay as it is but it doesn't have that wow feel and it's a bit out-dated. It's my entry room. It's done in blue and very 80's country. I'm going to change the accessories and make it more cottage/garden. I always have fun changing things up. If I had the money and time I'd probably gut the whole room,
 but I don't so I'm not.
The first thing I'll be doing is making some accessories
 to go in the room. I'll be sharing them as the days go on.

Project #1
I have this old book that has pictures of roses in it,
I thought that would be great to use to frame a couple of pictures.
Cottage style can always use roses.
The book is really old but has great pics of roses. I want to add a bit of red
 to the room so these are the two I chose...
I had these old picture frames that will work just fine...
a little black paint....
I decided to go with a green matt. I simply cut the paper
to fit the frame and matted the picture on top of it...
I also added a touch of gold to highlight the frame...
Here's the result without the gold, I took the picture before I added it...
I really like the way they turned out.
I'm not going to put them up until I finish some other projects.
Stay tuned....
LinkWithin

Blog Widget by LinkWithin