Monday, January 30, 2017

Create Personalized Business Accessories

I'm getting ready to launch ( or should I say "restart" ) my business. I have been working on creating a few business accessories that I will need. Super easy and fun to make.
 A few things I did order such as business cards from Vista Print and a personalized stamp from Rubberstamps, but other than that I just used my computer, printer and some basic craft supplies that I  already had and, of course, I always try to save money so my local thrift store is the best place to find things like frames, small boxes and fabric.

 I had to go with a floral theme- I just love flowers ( and this is what I chose from Vista Print for my business cards). Cute matching boxes I found at the thrift store will hold small accessories. The business card holder I found at OfficeDepot.
I found this frame at the thrift store - perfect color. I inserted a print with my business name that I will set out at shows. The pad of paper was just the right colors - another find at the thrift store - I covered the top with my own logo, it had sea shells on it, but the blue colors were another perfect match.

This frame I decorated with a flower I made using my Cricut.

I have to put tags on my items so why shouldn't they coordinate? These were fun to make using my Cricut, Scan n Cut, punches and stamps.


I had to have a tote bag to carry things in so I dressed up a plain tote using Mod Podge photo transfer. You can see how to do it here.
I added ruffles...
and fabric flowers, you can see how to make them here...

also when I am at shows, I thought an apron would be nice to keep things handy so I made one out of old jeans...

 the front already had pockets but I added a couple more...

for tools, scissors, paper, etc...

and a covered pocket for money...


 a flower...

and ruffles in the same fabric I used on the tote bag...


Now I think I have all the accessories I'll need.

Friday, January 27, 2017

Craft Supply Storage

After having to go through every item in my craft room, I finally have everything put away. My four top organizational tips that I found helpful, that might also help you, include:

1- Keep items you use most often within easy reach -

             I made this can caddy to store items I use all the time - glue sticks, scissors, craft knife, pens, screw drivers, wire cutters, etc.
 
I also have open storage so I can just grab things like tape, glue, etc.

the items I use most are right behind where I usually 
stand on the middle or bottom shelf


2- Label all containers so you know what's inside-

most items fit in containers I already had but for some things
 I had to find a box then I covered it in pretty paper. I made 
matching labels for all containers


3-Store like items together-

 All my ribbon is in a drawer. I went through all my ribbon and wrapped it around cardboard squares which really helped save space,


I put all my washi and decorative tape in a drawer
 using a kitchen utensil tray to help contain items,

 all my punches are in one drawer,

I made this storage shelf out of foam core for all my stampin up inks,

Cricut Cartridges are right above my machine,

all my paint is in a floral tin...

I unmounted all my wood mount stamps ( saves a ton of space) 
and store them in two 3-ring binders,


embossing folders in box next to sizzix,

and finally-
4- Add special items that you enjoy looking at-


I hope I have inspired you to organize your craft room and to make your surroundings a place that inspires you and stimulates creativity - happy crafting.

Thursday, January 26, 2017

Craft Room Tour Cont'd

My craft room used to look like this
basically everything was hidden behind curtains. I had everything on shelves and when I was working on something I just moved the curtain and when I was done I closed up the curtain. It has worked fine for me but it was time for a change. I really wanted everything in drawers for easy accessibility, I hated having to lift a container up to get to something below it. Believe me drawers are the way to go. I had been looking around for about a year for just the right set. Most new units were way too expensive and made of particle board and everything I saw at the thrift stores or yard sales just didn't have enough pieces for a nice set. Then, finally, I found a beautiful set on craigslist that had shelves on top and drawers on the bottom and it even had a corner piece, solid wood and a great price - score!

 It was a large job, moving every single thing out and then going through all my supplies and sorting and organizing it and then figuring out where to put it. I left a part of a curtain up to hide the large bins I have that hold items like silk flowers.
 I finally got it done and I am very pleased with the way it turned out.

I have a lot of pretty containers labeled and plenty of closed cabinets for larger items.
And plenty of drawers for storage.


 I put all the supplies I use regularly at easy reach and items 
I rarely use I put up high. 

You really find out how much stuff you have when you have to go through it all.

I had a lot of decorative boxes already but if I didn't I just covered plain boxes with scrapbook paper and added a label.
Next time I 'll share more of the details and some organizing specifics.

Wednesday, January 25, 2017

Craft Room - Sewing Area

If you're like me, you don't enjoy just one type of craft but have many, many types of crafts that you enjoy doing. I really enjoy floral arranging, card making-really any paper crafts, painting, crocheting, vinyl design, jewelry making, wood working, sewing - I think you get the picture. I just love making things.

Well today I'm going to show you my sewing area in my craft room. My craft room really isn't a craft "room" but more of a part of my basement. It is located around my laundry.

 Although I have thought of moving upstairs to a room, the basement really is a better place. I have access to water because of the laundry and the large sink allows me to wash out things like paint brushes and I don't have to worry about making too much of a mess since it is the basement. I have a large open area in the middle that I can lay out fabric or set up my ironing board, I have even put down a tarp and painted furniture there. So, the basement really is the best place for my craft area. Even though the basement isn't finished we use it like it is. I covered the ceiling with fabric and put rugs around. I even painted the concrete floor you can see how I did it here


Wow! I did plan on this being a tour of my sewing area; sorry to ramble on.

My sewing area is located right across from my crafting table.

I have my sewing machine on an old vanity that I had as a kid and repainted. My sewing machine is really old and heavy, but it works great. I keep a sewing basket on one side and my iron on the other. Most of my thread and bobbins are in the 2 small drawers of the vanity. You're probably thinking "look at all that stuff!" believe me it's not as cluttered as this picture looks. I do like to surround myself with pretty things though.


Gotta have music while crafting


That big green box is my sewing machine ( I told you it's old). A long time ago I painted it and decoupaged it with rose pictures. I couldn't stand the ugly brown cover it had.
I have a shelf above my machine that holds air freshener, laundry sheets, and such.

There is a hutch next to my sewing table that holds extra fabric inside and my magazines, buttons and anything else I need to put somewhere.


Sometimes, I make things and then have to put them somewhere  - like this bird I painted and decorated with scrapbook paper and cricut paper flowers.


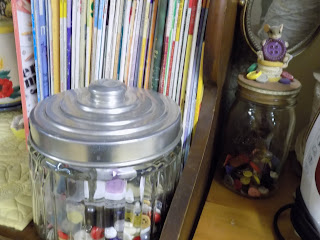
I do try to keep small items in pretty containers, like these jars that hold my buttons. Yes, this is the Charming Tails mice I collect. I found this jar top at a yard sale - perfect fit.


I have my ironing board next to my hutch where I can easily bring it out.
whew ! That's a lot. But I love crafting. Where do you craft or sew or paint or make cards or quill or crochet or....?

LinkWithin

Blog Widget by LinkWithin